Let’s begin with updating the server.
apt update && apt upgradeNow choose Nginx or Apache, I will use Nginx
apt install nginx -yCheck if the service is running with
systemctl status nginxNext part is to download MySQL for the database.
wget https://dev.mysql.com/get/mysql-apt-config_0.8.28-1_all.deb
apt install ./mysql-apt-config_0.8.28-1_all.deb
apt update
And now install the MySQL
apt install mysql-serverLet’s secure our MySQL instance with the command:
mysql_secure_installationFollow the steps set root password if preferred and disable remote access.
Now let’s install the latest PHP version, in my case this would be php8.2
apt install lsb-release apt-transport-https ca-certificates software-properties-common -y
wget -O /etc/apt/trusted.gpg.d/php.gpg https://packages.sury.org/php/apt.gpg
wget -O /etc/apt/trusted.gpg.d/php.gpg https://packages.sury.org/php/apt.gpg
Now update and install PHP.
apt update && apt install php8.2 -y
apt install php php-mysql
apt install php-curl php-xml php-imagick php-mbstring php-zip php-gd php-intl
To confirm the version, run the command php -v
To hardcode mysql to only listen on 127.0.0.1 add the following to the configuration file:
nano /etc/mysql/mysql.conf.d/mysqld.cnfAdd the following under the [MYSQLD]
bind-address    = 127.0.0.1
mysqlx_bind_address = 127.0.0.1
And then restart the MySQL, now the port 3306 won’t be reachable from the internet even tho we disabled the remote login to the database this is a good way of protecting the server from external port scans.
systemctl restart mysqlConfirm that the mysql is running on 127.0.0.1 with follwoing command:
ss -ltnp | grep "mysql"
LISTEN 0      151        127.0.0.1:3306       0.0.0.0:*    users:(("mysqld",pid=1510437,fd=23))
LISTEN 0      70         127.0.0.1:33060      0.0.0.0:*    users:(("mysqld",pid=1510437,fd=21))
Now let’s create the database and the user, login to MySQL with following command: (If you skipped to set root password, just press enter on the password prompt)
mysql -u root -pLet’s create the database, my database name will be wp_db
CREATE DATABASE wp_db;To create the user run: (change wp_user to your username, you can also generate username and the password)
CREATE USER 'wp_user'@'localhost' IDENTIFIED BY 'STRONG-PASSWORD-GOES-HERE';Now when the user is created we need to grant the privileges, so the user can access the database we just created.
GRANT ALL PRIVILEGES ON wp_db.* TO 'wp_user'@'localhost';Last part is to flush the privileges and exit the MySQL.
FLUSH PRIVILEGES;
Exit;
Let’s download the WordPress files now.
cd /tmp && wget https://wordpress.org/latest.tar.gzNow extract the files, this will create a folder called “WordPress”.
tar -xvf latest.tar.gzLet’s copy over the files to /var/www/html
cp -R wordpress /var/www/html/We now need to set the right permission for the folder and files.
chown -R www-data:www-data /var/www/html/wordpress/Change the file permission to 755
chmod -R 755 /var/www/html/wordpress/The upload folder does not exist so let’s create it and set the correct permission.
mkdir /var/www/html/wordpress/wp-content/uploads
chown -R www-data:www-data /var/www/html/wordpress/wp-content/uploads/
Now you could access the website by going to http://server-ip/wordpress but that is not the point, we want to have domain and reach the site with the domain name.
Let’s create a file for the nginx. (you can call it something else does not need to be “WordPress.conf”)
nano /etc/nginx/sites-enabled/wordpress.confIn the file add the following:
server {
    listen 80;
    root /var/www/html/wordpress;
    index  index.php index.html index.htm;
    server_name  mydomain.com;

    client_max_body_size 500M;

    location / {
        try_files $uri $uri/ /index.php?$args;
    }

    location = /favicon.ico {
        log_not_found off;
        access_log off;
    }

    location ~* \.(js|css|png|jpg|jpeg|gif|ico)$ {
        expires max;
        log_not_found off;
    }

    location = /robots.txt {
        allow all;
        log_not_found off;
        access_log off;
    }

    location ~ \.php$ {
         include snippets/fastcgi-php.conf;
         fastcgi_pass unix:/var/run/php/php8.2-fpm.sock;
         fastcgi_param SCRIPT_FILENAME $document_root$fastcgi_script_name;
         include fastcgi_params;
    }
}
Check if nginx likes the configuration with command:
nginx -t -c /etc/nginx/sites-enabled/wordpress.confNow let’s create symlink for this file:
ln -s /etc/nginx/sites-enabled/wordpress.conf /etc/nginx/sites-available/wordpress.confNow restart nginx service and let’s setup certbot so we get a secure https protocol enabled.
systemctl restart nginxNow let’s install certbot.
apt install certbot python3-certbot-nginxNow run trigger the certbot:
certbot --nginxThis will ask you about your server, certbot grabs the “servername” from the nginx configuration, in this case that would be “mydomain.com”
This will add a few lines in your wordpress.conf file and redirect all http to https.
Now we are on the last part, go to your URL in the browser and you should see the setup wordpress page:

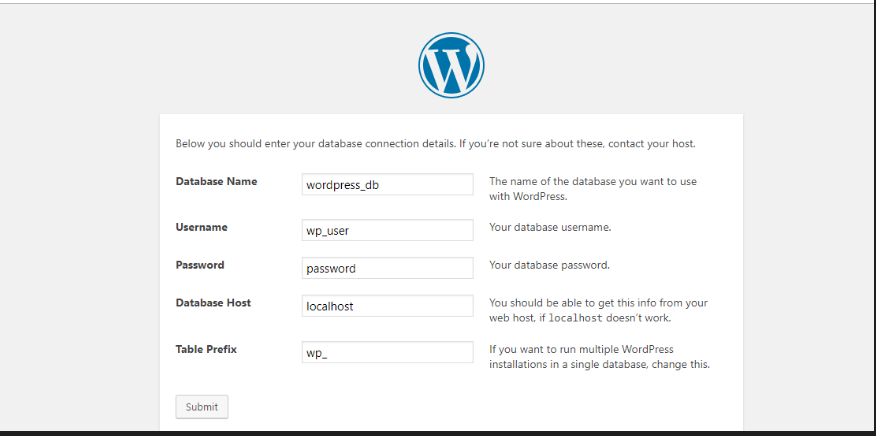
Database Name for us would be: wp_db
Username: wp_user
Password: password
Database Host: localhost (this means that the database is on the same server)
Table Prefix: wp_
Click on Submit and you should see next page
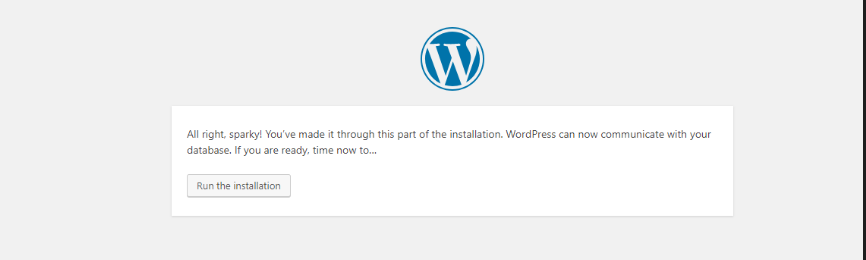
Run the installation and you can now create admin user.
Your WordPress website is up and running on safe port 443 HTTPS and you are now ready to create your blog or website!
I recommend hosting a website on Digital Ocean, they also provide a marketplace with 1 click WordPress setup!
